
 (2 votes, average: 5.00 out of 5)
Learn how you can create videos (movie clips) from your PowerPoint slides using Windows Movie Maker. Note that this tutorial is only applicable to PowerPoint for Windows users, and also only for those who use PowerPoint 2007 or older versions since PowerPoint 2010 and newer versions allow you to create video output natively from within PowerPoint.
This tutorial shows you how you can create YouTube content with nothing other than PowerPoint and Windows Movie Maker. These techniques work with PowerPoint versions 97 through 2007 for Windows. You must also have Windows Media Maker available.
Follow these steps to get started:
1. Fine Tune the Presentation

Remember you will lose all your custom animations using this process. So make your slides simple. If you want to show stages or evolution using animation, create multiple slides for that process so that each animated stage is a new slide.
Don’t use too much text on the slides. There are some more fine-tuning tips that you can read here.
Remember to save your presentation often.
When you are ready to proceed, choose File | Save As (PowerPoint 2007 users can choose Office Button | Save As | Other Formats).
2. Save as PNG
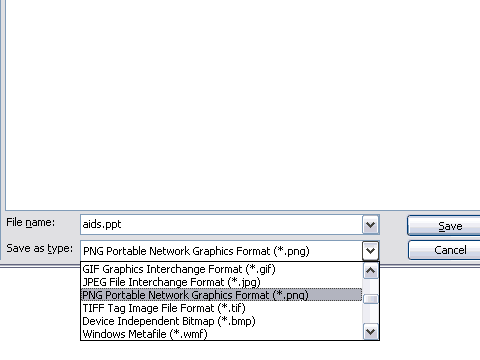
In the Save as type drop-down box, choose PNG as the file format, and click the Save button.
3. Save all Slides

PowerPoint will ask you if you want to export all slides or just the currently selected slide. Choose the Every Slide option.
4. All Slides Saved!

PowerPoint will inform you that all the slides have been saved in a folder.
5. See them!

Look in the folder where PowerPoint saved the slides to make sure they are all there!
6. Launch Windows Movie Maker

Launch Windows Movie Maker from the Start menu. The path is Start | (All) Programs | Accessories | Windows Movie Maker.
7. Import Clips

Choose File | Import into Collections to import the PNGs you saved from PowerPoint.
8. Select the PNGs

Navigate to the folder where the PNGs were saved, press Ctrl + A to select them all, and click the Import button.
9. PNGs are Imported

Once the clips have been imported, you’ll see the slide PNGs in the Collections area.
10. Show Storyboard

In the timeline area under the collection, change the view from Timeline to Storyboard. If you are already in Storyboard view, don’t change to Timeline.
11. Change Options

Choose Tools | Options, and select the Advanced tab.
In the Default durations section, change the Picture duration to something like 10 seconds. If there’s not too much text on your slides, change it to something like 7 seconds. If your slide PNGs are chock-a-block of text, change it to a higher duration. Let the transition duration remain at 1.25 seconds.
In the Video properties section, choose between NTSC or PAL. NTSC is the video standard used in the USA, Japan, and many other countries. Many European countries and India use the PAL standard.
You might also want to change the Aspect ratio to 1widescreen original PowerPoint presentation was a wide screen presentation. Otherwise, leave it at 4:3.
12. Drag to Storyboard

Drag the first slide to the first position on the storyboard. Similarly, place other slide PNGs on the storyboard.
Tip: You can also select all slide PNGs and drag them at once to the storyboard. If some of the slides don’t seem to be in sequence, you can drag them and place each slide in a sequential position within the storyboard.
13. Save Project

Now is a good time to save your Movie Maker project. Choose File | Save Project As to summon the Save Project As dialog box. Choose a name for the project, select a location and click Save.
14. View Transitions

Choose Tools | Video Transitions to view the transitions.
15. Add Transitions

Drag any transition to the small box between any two slides. Add similar transitions between all slides.
Tip: Remember not to overdo your transitions. Keep them subtle so that your presentation can get more attention than the transitions!
16. Preview the Movie

You can now preview your movie in the preview window.
17. Add Music

Click the Import audio or music option in the Movie Tasks area to bring up the Import File dialog box. Select a music clip, and click Import to get back to Movie Maker.
You’ll find the imported music clip in your Collections area.
18. Place the Music

Right-click the music clip, and choose Add to Storyboard.
19. Timeline View

Windows Movie Maker will prompt you with a message that says audio clips can only be added in Timeline view. Click the OK button to get back to the interface in Timeline view.
Timeline view will be familiar to you if you have used a video application before. But as you can see in the screenshot above, the music clip that we placed does not last as long as our movie!
20. Add More Music

You can now select the same music clip in the Collections area and drag them to the timeline. By the time we had enough music to last the duration of play for all inserted slides, we ended up with three instances of the music clip.
In the end, our music clips exceeded my slide duration!
21. Trim Music

Drag the rightmost edge of the music clip, and drag it towards the last slide so that the endpoint for both the slides and the music is identical.
Remember to save your project often.
22. Save Movie

Choose File | Save Movie File to bring up the Save Movie Wizard.
Choose the My Computer option to create a high-quality movie file. You want to create a high-quality movie file since video sites like YouTube recompress all the content you upload when converting it to their internal format. So, if you upload higher quality content, you’ll end up with better-looking movies.
Click the Next button and provide a name and location for the output movie.
Click Next, and Next again.
23. Render Movie

Windows Movie Maker starts rendering (saving) your movie.
Once that’s done, Windows Movie Maker shows the Finished movie screen. Check the Play movie when I click Finish option and click the Finish movie button.
24. Upload to YouTube (or Another Video Site)

You can finally upload the movie (video) to YouTube.
Related Posts
 Flypaper is a cool, new presentation creation program that lets you create Flash presentations that you can instantly upload to sites like YouTube, My...
 Note: Omnisio was acquired by Google soon after this post was published.Omnisio, a new startup allows you to mix and mash videos from several online v...
 Note: This post was first written in 2007. Since the content of this post is still applicable to newer versions of PowerPoint, we have slightly edited...
 This page is a vibrant guide to mastering the art of “micro-presentations”—bite-sized PowerPoint stories designed to be delivered in 90 seconds or les...